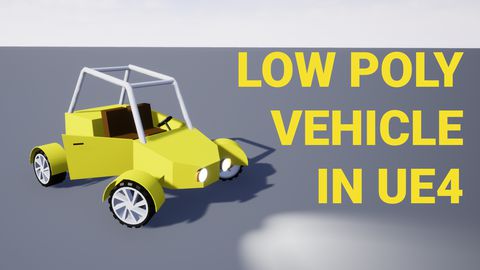
Setting up basic vehicle in Unreal Engine 4 | [Part 6] Low poly vehicle for UE4
by Arthur Ontuzhan
Posted 6 years ago Last edit 2 years, 4 months ago
Categories: Tutorials Unreal Engine Tags: Vehicle UE4
Introduction
This is the sixth part of the tutorial series on how to create a low poly vehicle for Unreal Engine 4 using Blender and other free software. You can see the outcome of the tutorial series or get project files here.
In this tutorial, we will import our vehicle model in Unreal Engine 4, and set basic vehicle functionality to it.
You can find other parts here:
- [Part 1] Modeling low poly vehicle base in Blender.
- [Part 2] Modeling low poly vehicle wheels.
- [Part 3] Texturing the vehicle model.
- [Part 4] Making speedometer and tachometer textures.
- [Part 5] Rigging vehicle the vehicle model.
- [Part 7] Making mudguards and brake calipers move together with wheels.
- [Part 8] Making openable doors and animated steering wheel.
- [Part 9] Adding lights and brake lights.
- [Part 10] Adding speedometer and tachometer and first person camera.
- [Part 11] Adding turn signals with automatic turn off.
- [Part 12] Generating and setting up basic engine sounds.
Also, there's a video if you have difficulties to understand some parts.
Model import in UE4
First, you need to have a UE4 project open. I will set up a vehicle in a blank game template project. You can use whatever project you want, but remember that you might need to adjust some things with your project.
- At first, I will make Vehicle folder in the main Content folder, where we will import and set all our things up.
- In the content browser open newly created Vehicle folder.
- Press the Import button.
- Select our vehicle's FBX file.
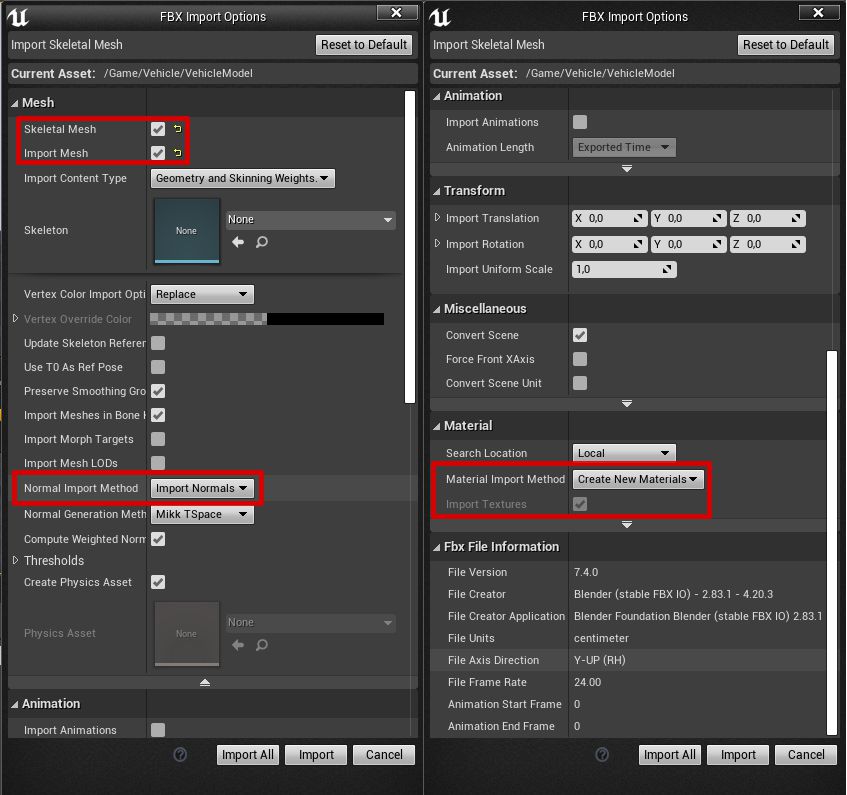
- In the import options make sure to have Skeletal Mesh and Import Mesh checked.
- In the import options change Normal Import Method to Import Normals, so our mesh wouldn't have weird artifacts in shading after import.
- Make sure that Material Import Method is set to Create New Materials, so it would automatically create for us some base materials.
- Press the Import button to import our assets.
After the import, you should see, that we have materials, textures, mesh, and other assets in the same place. Let's organize them, so they would not all be in the same place. Also, I like to rename assets by giving them prefixes depending on their type (I usually follow this style guide when I rename assets).
- (Optional) Rename files as in the image below.

Now we can make new folders and move our assets into them.
- Make Materials folder - Put all material assets in there.
- Make Textures folder - Put there our only texture in there.
- Make Meshes folder - Put our vehicles Skeletal Mesh, Physics Asset, and Skeleton asset in there.
- Make TireConfigs folder - We have nothing to put there yet, but we will put Tire Configurations there later.

Now we should have only 4 folders left in our Vehicle folder. We can now start by setting up our vehicle.
Physics Asset
We will start by editing Physics Asset. Auto-generated physics assets usually aren't great for vehicle rigs and this time it is no exception if you use a model which we created in previous tutorial parts. Let's start by opening physics asset, which should be now located in the Meshes folder.
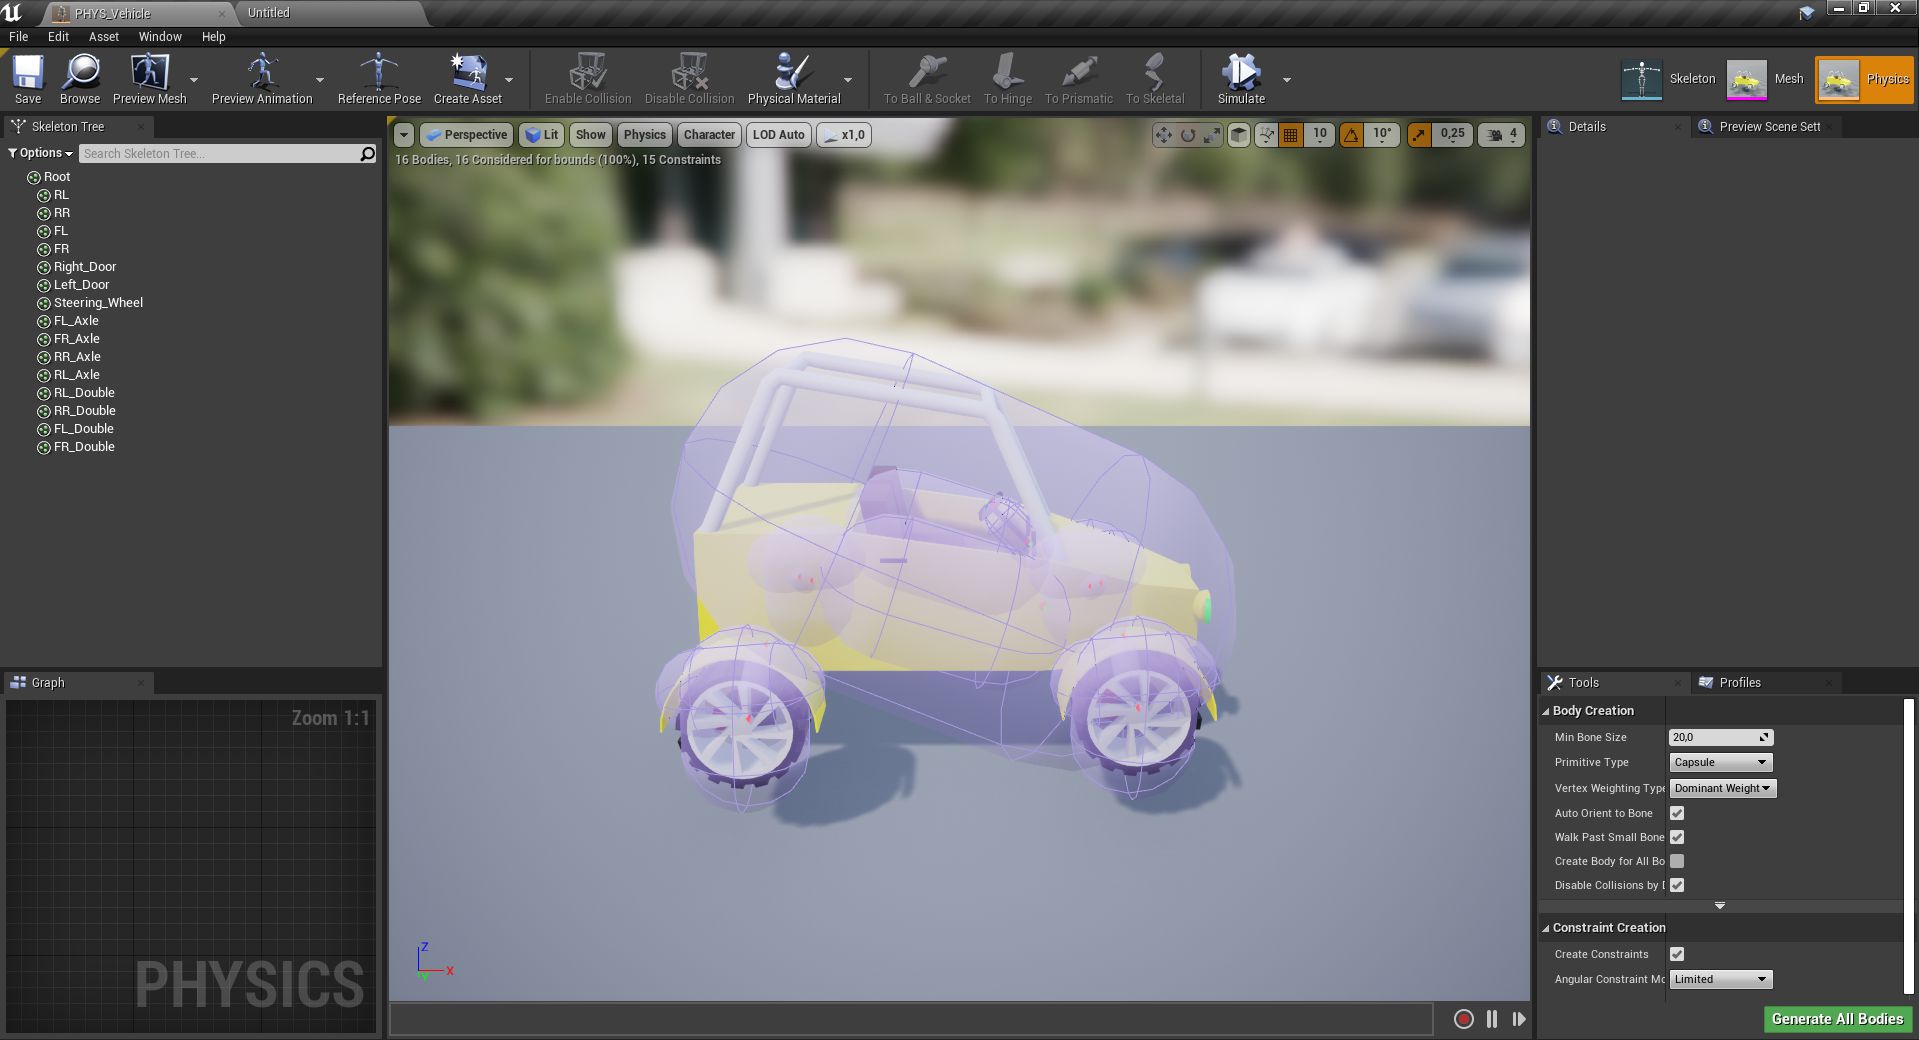
We can see that Physics Asset is made from lots of capsule physic bodies. Our wheels, doors, basically every bone has some capsule assigned to it. Let's remove all capsules and add physic bodies which makes more sense to us.
- Press Ctrl + A to select all physics bodies.
- Press Delete to delete all selected physics bodies.
Now we need to add new physics bodies that would make more sense.
- In the Skeleton Tree select Root bone. If you don't see any bone in the skeleton tree, open its Options menu and change Hide Bones to another choice until you see bones in the skeleton tree.
- In the Tools tab for Primitive Type select Box and make sure that Auto Orient to Bone is unchecked.
- Click on Add Bodies button, you should have generated a new box physics body for the vehicle's body.
- Select all Wheel bones in Skeleton Tree tab. We named them as RL, RR, FL, FR.
- In the Tools tab for Primitive Type select Sphere.
- Click on Add Bodies button, you should have generated a new sphere physics body for the wheels.

If you have done all previously mentioned things for the asset, you should get a similar outcome as we have in the image above. Also, you can move, scale, rotate them manually, just like moving objects in the editor.
In the physics asset, we need at least one physics body, so our vehicle physics would work. We could have skipped wheel physic bodies, but in this case, it seems reasonable to add physic bodies to wheels, which are so outwards from the vehicle body.
Wheel Blueprints
If you have read my tutorial on how to rig vehicle for UE4, then you might remember, that we made a single wheel blueprint for all wheels. This time we will make a blueprint for front wheels and another one for rear wheels. Also, we will make tire configs for blueprints, so we could change their friction.
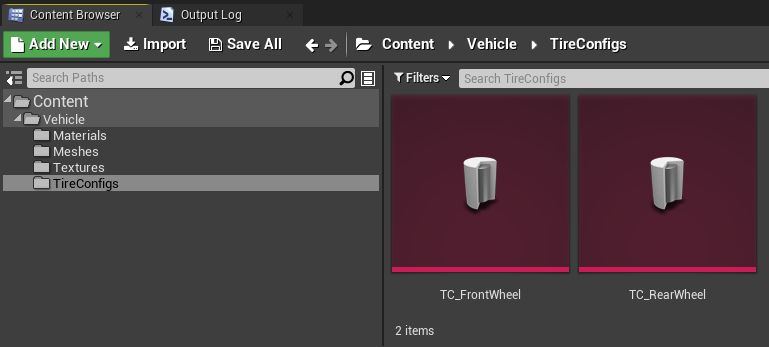
Let's start by making Tire Configs for our wheels:
- Go to the TireConfigs folder.
- Click Add new button or right mouse click in the content browser.
- Go to the Miscellaneous section and there select Data Asset.
- Then in the window select TireConfig data asset class.
- Rename newly created asset to TC_FrontWheel or whatever you like.
- Open the newly created asset and change the Friction Scale to 2.
- Save and close it.
- Use previous steps to make another TireConfig. Rename other asset to TC_RearWheel and set its Friction Scale to 3.
Now we can create wheel blueprints.
- Move back to Vehicle Folder.
- Click Add new button or right mouse click in the content browser.
- Select Blueprint Class.
- Expand All Classes tab at the bottom select VehicleWheel class.
- Rename it to BP_FrontWheel or whatever you like.
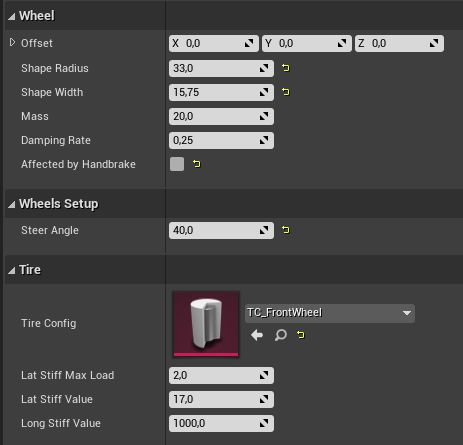
- Open newly created asset.
- Change Shape Radius to 33.
- Change Shape Width to 15,75.
- Uncheck Affected by Handbrake.
- Change Steer Angle to 40.
- Set Tire Config to TC_FrontWheel or whatever you named yours.
We also need a blueprint for rear wheels.
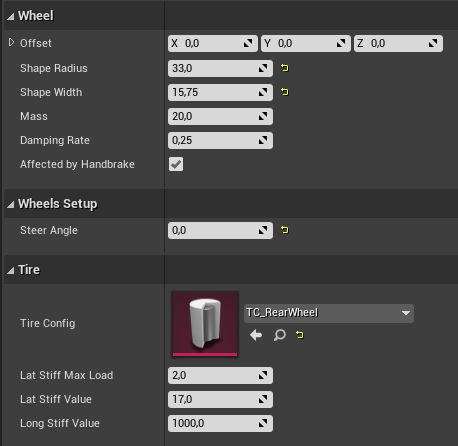
- Create another wheel blueprint and name it BP_RearWheel.
- Change Shape Radius to 33.
- Change Shape Width to 15,75.
- Change Steer Angle to 0.
- Set Tire Config to TC_RearWheel or whatever you named yours.
Our wheel blueprints are done.
If you ever try to set up wheel blueprints for other vehicles, then remember that in wheel blueprints Shape Width actually is the half-width of the wheel.
Animation Blueprint
We need an animation blueprint for our vehicle.
- Click Add new button or right mouse click in the content browser
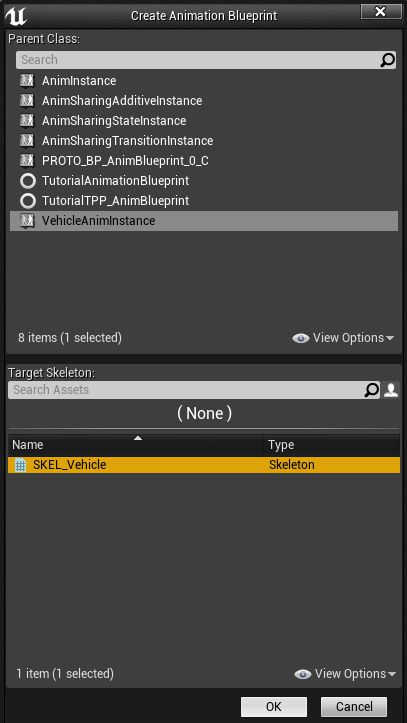
- Under Create Advanced Asset move to Animation and in a sub-menu select Animation Blueprint
- In Create Animation Blueprint window as Parent Class select VehicleAnimInstance
- In the same window as Target Skeleton select the vehicle's skeleton.
- Press OK
- Rename it to ABP_VehicleAnim or whatever you like.
- Open newly created animation blueprint.
- Open Anim Graph.
- In there make blueprints like in the image below.
- Compile, save and close it.

Vehicle Blueprint
Now we have all things which we need to create a basic vehicle blueprint.
- Click Add new button or right mouse click in the content browser
- Select Blueprint Class
- Expand All Classes tab at the bottom of the class select window
- Search for WheeledVehicle class and select it
- Rename it to BP_Vehicle or whatever you like.
- Open the blueprint.
- Under the Mesh component add a Spring Arm component as a child.
- Under the Spring Arm component add a Camera component as a child.
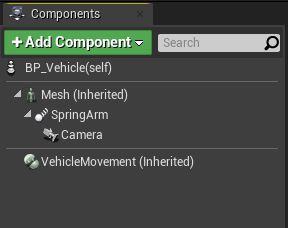
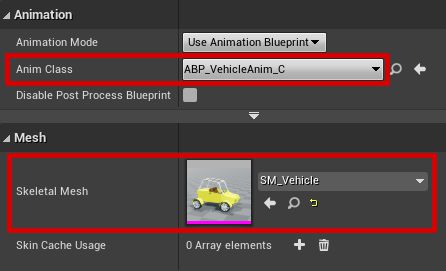
We need to assign mesh to our Mesh component and set Animation Class for it too.
- Select the Mesh component.
- In the Details tab set Skeletal Mesh and Anim Class.
Right now Spring arm placement isn't really great, let's fix that.
- Select the Spring Arm component.
- Change its Transform Location to X 0, Y 0, Z 90.
- Change its Transform Rotation to X 0, Y -10, Z 0.
- Change Target Arm Length to 600.
- Uncheck Inherit Pitch and Inherit Roll. This isn't related to the spring arm placement, but it makes camera less wobbly when you drive vehicle.

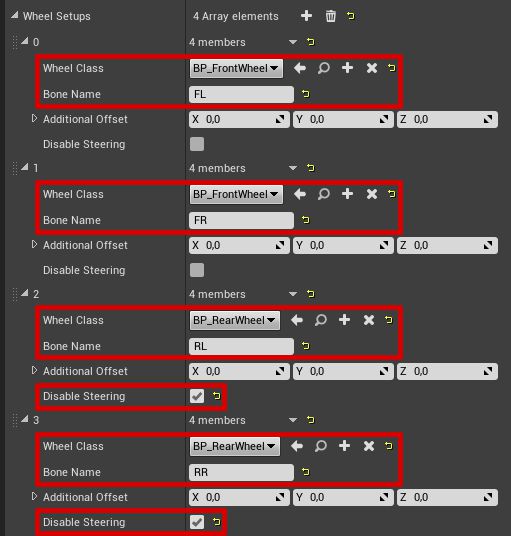
We need to set up wheels for the vehicle.
- Select the VehicleMovement component.
- In the Details tab move to Vehicle Setup section.
- Expand Wheel Setups and set wheels as shown in the image below.
Now we will make use of our set up input bindings for this project and make this blueprint do something with them.
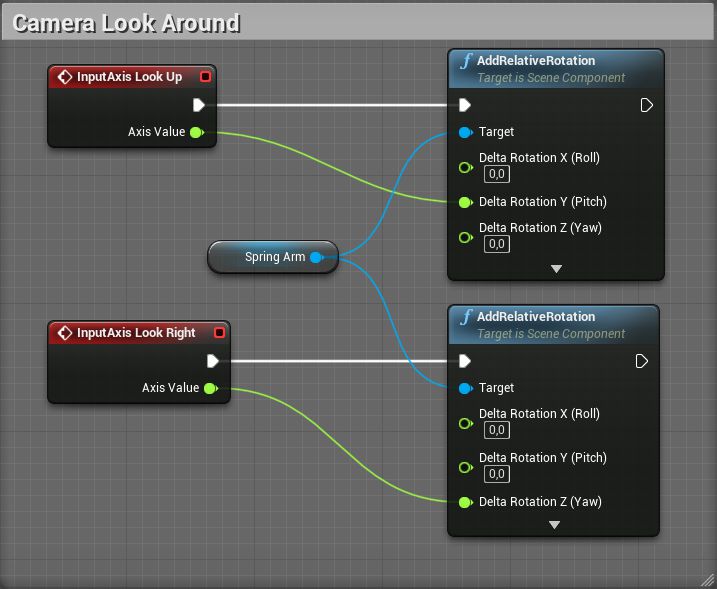
At first, we will make it possible that we can move the camera around with the mouse input.
- Open Event Graph.
- Make blueprints that you see in the image below. On AddRelativeRotation node, you will not have 3 inputs by default, to get them Right click on Delta Rotation variable and press Split Struct Pin, and now you will have 3 inputs.
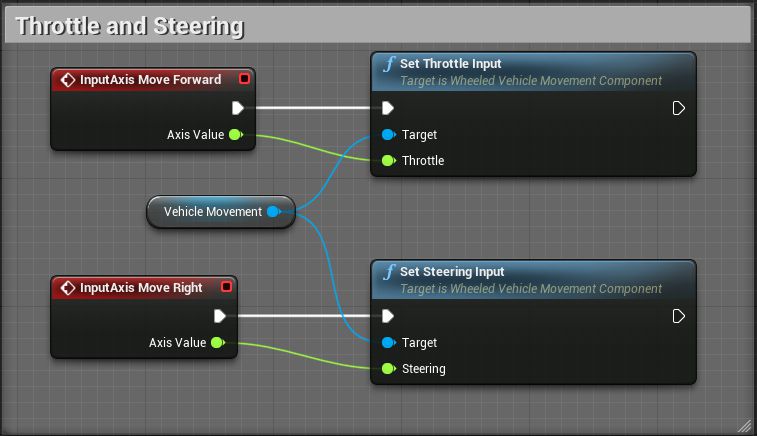
Let's add throttle and steering functionality.
- Make blueprints that you see in the image below.
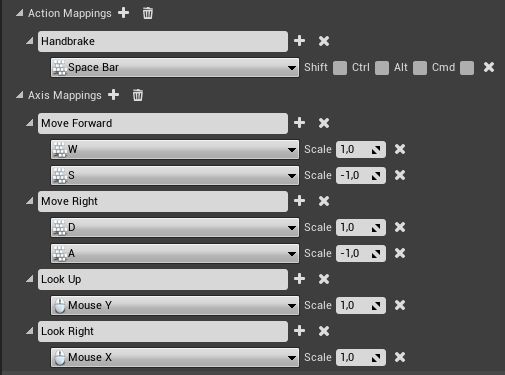
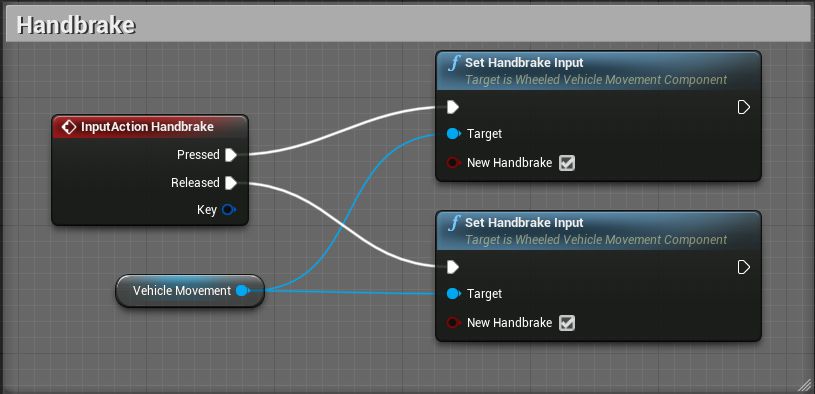
We also have a handbrake input bind.
- Make blueprints that you see in the image below.
Now you can drive this vehicle. Just pull out its blueprint into a level and set it as default pawn in your game mode or set its Auto Posses Player to Player 0.
After some driving around, you might find out that it's pretty easy to flip over this vehicle when making sharper turns on higher speeds. To fix that, we can lower our vehicle's center of mass.
- In the Vehicle Blueprint select Mesh component.
- In the Details tab find the Physics section and expand advanced settings.
- Change Center Of Mass Offset to X 0, Y 0, Z -40.

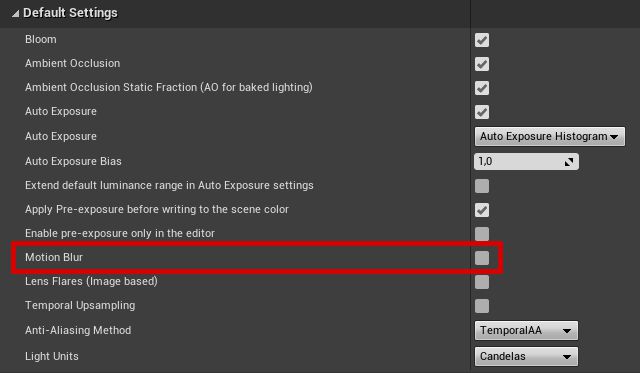
You also probably have noticed that vehicle wheels on higher speeds start to blur out weirdly. That happens because Motion Blur is enabled. You can disable it in the Project Settings in the Rendering tab.
You also probably have noticed, that wheels go through mudguards, and that front mudguards don't rotate together with the wheels. We will fix that in the next tutorial.
Share on
Related Creations
Related Articles
How to get simple suspension animation for vehicle in UE4 with Blender 2.8
Tutorials Blender Unreal Engine
Rigging the vehicle model in Blender | [Part 5] Low poly vehicle for UE4
Tutorials Blender Unreal Engine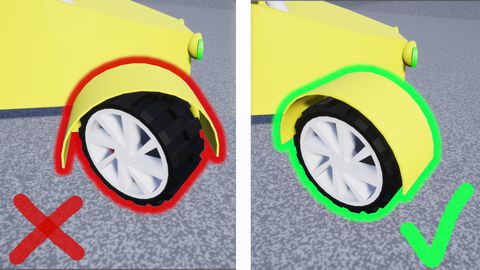
Making openable doors and animated steering wheel | [Part 8] Low poly vehicle for UE4
Tutorials Unreal Engine
Adding speedometer and tachometer and 1st person camera | [Part 10] Low poly vehicle for UE4
Tutorials Unreal Engine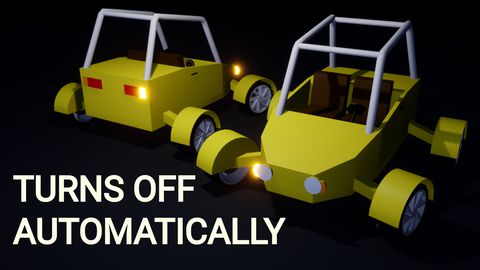
Adding turn signals with automatic turn off | [Part 11] Low poly vehicle for UE4
Tutorials Unreal Engine