Procedurally Animated Character that Paints Time in Unreal Engine 5
by Arthur Ontuzhan
Posted 1 year, 8 months ago
Categories: Unreal Engine Devlog Tags: Animation UE5
So one day, I stumbled upon this interesting clock video.
And after a quick Google search, I found out that it's a 12-hour-long video of an actual man painting a clock's hands, which was made by Maarten Baas. He has a few more interesting clock ideas that you can check out here.
So the idea seemed interesting enough to me that I decided to try to recreate something remotely similar in the Unreal Engine. So I started by creating a new third-person template project in Unreal Engine. And I stumbled upon my first problem: I have no clue how to paint on objects in the unreal engine.

So I googled the issue, found this video, and put the knowledge from the video into my project.
And now I'm able to paint a cute flower in it.

But I had to paint it manually. And I'm way too lazy to do manual painting for 12 hours, so it would be nice to make an automatic painting system. So I quickly made a system that can paint predefined lines.

And for now, it should be good enough to let me start to work on the character's animation system. So I made a new simple control rig for the character and implemented it into the animation and character blueprints.

And now, whenever the character gets closer to the canvas object, it should aim at the place where the painting is happening.

But as you can see, I messed up somewhere. So tip #1: You can use debug nodes to visualize coordinates in the world's space and find out that you messed up some of your calculations.

And after you fix your calculations and see that things are still not working, tip #2: If in control rig blueprints you're using world space position, make sure that you're converting it from world space to rig space.

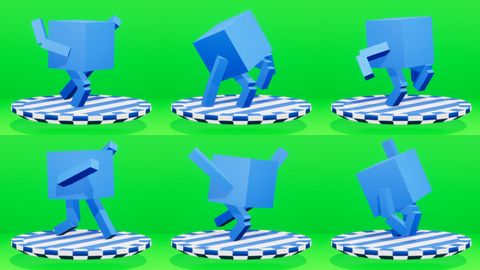
So now, after I have fixed these things, I can look at other things I should fix. If we zoom closer at the hand, we can see that the finger that's used in the control rig for animation looks crooked.

So I thought that maybe if I applied a premade pose to the hand, the issue would get fixed. So I quickly made a temporary hand pose asset.

Tip #3: If you drag your pose asset into the animation blueprint and don't know what to put into the Source Pose input, you can right-click the pose asset node and convert it to Pose By Name.

And then, in the node details panel, you can set a pose name which you can find in your pose asset.

Tip #4: If in the animation blueprint you apply your pose and the character mesh becomes messed up, make sure that your pose asset is set to be additive. You can do that by checking the additive checkbox in the asset details panel and then clicking on the Convert to Additive Pose button.

And now, I can see that the crooked finger issue is still an issue.

So tip #5: In the control rig, instead of trying to aim bones by using aim nodes or trying to figure out how quaternion math works, you can add a new bone at the end of your problematic bone and then adjust its initial position so it would be at the tip of the finger.

And then use the new bone to drive the animation in the control rig. And now we can see that the finger is way less crooked.

So the next thing I want to implement is the ability to erase the painted lines. So I made the character use the other hand to paint white. But I wanted to make it look a bit different from the painting action, so I added circular motion to make it look like it takes more effort. And then I started to work on the clock's hand painting system. At first, I made it to paint the clock's hands, erase them, increment the clock's time by a minute, and paint it again.

I wanted to speed up the animation so I wouldn't need to wait too long to see the whole animation cycle, so I sped up the time in the unreal engine and realized that my base painting system is frame rate dependent.

It means that at lower FPS, it will look like it's drawing dots instead of lines. So it took some time to fix that, but now there are no more dots at lower frame rates. And now it's probably a good time to put something in the character's hands so it doesn't look like it is painting with the middle finger.
So I quickly made this 3D brush model that looks more like some sort of plug than a brush.

Then I added a socket to the skeletal mesh and put a brush asset in it. And also, I made a new pose asset for the hand.

And then I updated the control rig, and tip #6: you can switch the viewport to an orthographic view for easier object alignment. At first, align your object in the top or bottom view, and then finish aligning in one of the side views.

And now we can see that the character is no longer painting with the middle finger, but its other hand is still empty.

So again, I made another 3D model, another pose asset, updated all blueprints, and noticed that the hand doesn't match the pose I made.

So it's happening because I'm applying a pose to an already existing character animation. To fix that, I need to replace the Apply Additive node with the Layered Blend per Bone node and set it up to use hand bones.

Tip #7: If you use the layered blend per bone node and you get weird results, make sure that your pose asset is not set to be additive. If it is, and you're converting it to not additive, make sure to click on the Convert to Full Pose button after you uncheck the additive checkbox.

And now it looks alright in the animation blueprint, but when I play the project, it still looks a bit off.

Tip #8: If you're having a similar issue, try converting your pose asset to the animation asset, and in the animation blueprint, replace your pose asset with the new animation asset.

At least that helped in my case. And now we can see that the character is no longer erasing with an empty hand, but the way it's doing it looks a bit weird to me.

So I spent some time in the control rig blueprints to make the hand logic a bit more complicated, and now it looks a bit better.

I wanted to work a bit more on it, but then I realized that in the original clock video, you look at the clock from another angle. So I probably should start to check how things look from the same angle in my project, so I don't spend time on things that might not even be visible from that angle. And right now I can't see much from that angle, so that's probably the first thing I should fix.

Tip #9: If you're having issues with transparency when drawing material to a render target, make sure that the drawing material has enabled this option called Used with Editor Compositing.

Tip #10: If you're noticing some visual glitches around objects in motion, those might be caused by motion blur. By disabling motion blur in the project settings, you can get rid of those glitches, or if you want to keep motion blur enabled, you can try changing the anti-aliasing method to make glitches less noticeable.
And now we can see through the canvas plane, but the background seems somewhat distracting.

So I made a new map with a less distracting background.

It's a simple map because it will be only seen from one angle. And from this angle, we can see that sometimes things might clip through the canvas plane.

So I added a mask to the object materials that would make object clipping parts transparent, but because the Unreal Engine materials are one-sided by default, you could sometimes see through the objects.

Initially, I thought that making material two sided wouldn't fix the issue, but you can't really notice holes in the objects from this angle. Also, it's pretty hard to tell the exact time without any indicators for hours or minutes. So I made a texture and painted it on canvas.

And if we look at the whole animation loop, we will notice that it's a bit choppy because there are no transitions between actions. So I added some basic transitions between actions, and it made the loop look smoother.
And tip #11: If you're using linear interpolation to drive your animations, try using easing functions for interpolation to make them more interesting.
Also, I realized that the gray background colors make this boring project look even more boring. So I applied gaming colors to it to make it look more interesting than it is.

Also, I still wasn't pleased with the animations, so I spent some more time trying to improve them. And I will admit that I'm still not happy with the animations, but I will not let my inner perfectionist make me spend even more time on them to make them slightly better when this project was supposed to be a quick and fun side project. So I decided that now's probably a good time to make it work as an actual clock.
And after some time of trying to understand my spaghetti blueprints, I made it work as a clock. Now I could call this project done, but I don't like how the character is just standing between the time updates. So I spent a bit more time on the project, and now the character will not be standing still while waiting for the time updates.
And then I packaged the project to check how well it will work outside the unreal engine editor, and it looks like there are some issues with the clock texture.

Tip #12: Try enabling the Never Stream option in texture asset settings if you're having issues with the texture being loaded.

And now it looks alright, but before saying that I'm done with this project, I should add a settings menu for it. So I simply copied the settings menu from one of my previous projects and made some changes to it.

And then I wanted to see how many FPS I could get on the lowest and highest graphical settings.

By doing that, I realized that I might have some problems with my vision because I can't see a difference between those settings.

(Image above: Left - Lowest settings, Right - Highest settings)
And then I got curious about how it would look if I disabled Lumen.

And without Lumen, there's a noticeable visual difference, and there's a noticeable difference in FPS too.

So I decided to add the ability to disable Lumen in the settings, but there's a small issue with that. In the Unreal Engine game user settings object, there's no setting for Lumen. So I guess it is a good time to test if one of my old Unreal Engine C++ tutorials is still usable. And turns out that it is still usable.

Also, I added the ability to increase bloom intensity in the settings if you want to make it look brighter and make it harder to see what time it is. So if you want to get this clock on your PC and make your PC into an overpriced electric heater, then there's a link to it at the top or bottom of this article. Also, if you want to check out the project files, remember that this project was made as a quick prototype, so there are lots of technical debt in the files, so you most likely will not find anything good in them.
Share on
Related Articles