Converting Unreal Engine 5 helicopter blueprints to C++
by Arthur Ontuzhan
Posted 4 years, 5 months ago Last edit 2 years, 3 months ago
Categories: Tutorials Unreal Engine Tags: Helicopter UE5 C++
Introduction
In this tutorial, we will take the helicopter asset that we made in one of the previous tutorials using blueprints, and rewrite it in C++, and look at some ways we can expose C++ variables to blueprints in Unreal Engine 5. This will not be an exact step-by-step tutorial on how to set up your programming IDE or a C++ basic tutorial, but more of a small insight on how we can use C++ in Unreal Engine 5. So you should know at least some C++ programming basics and have a programming IDE for Unreal Engine set up to be able to use this tutorial.
Video

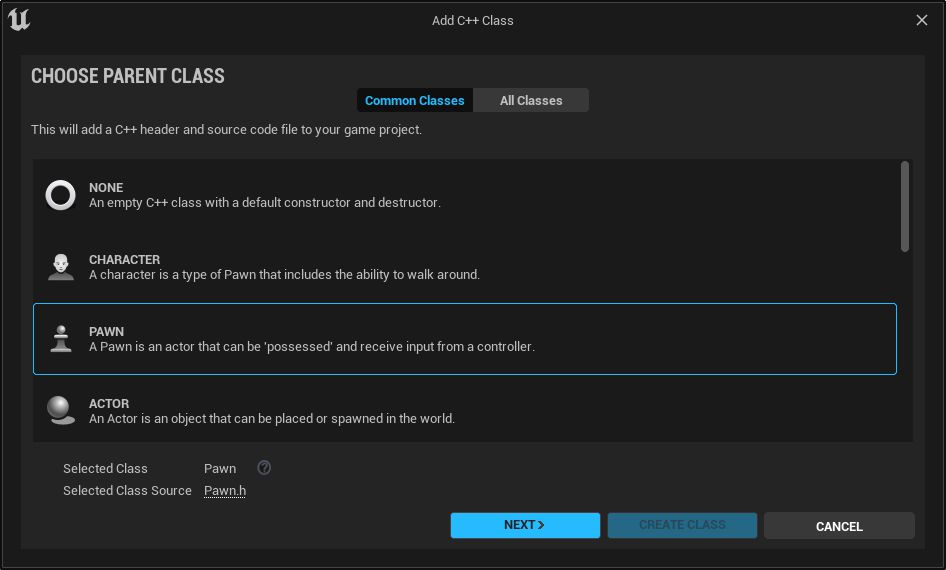
- Into the newly opened window from the common class list select Pawn and click Next.
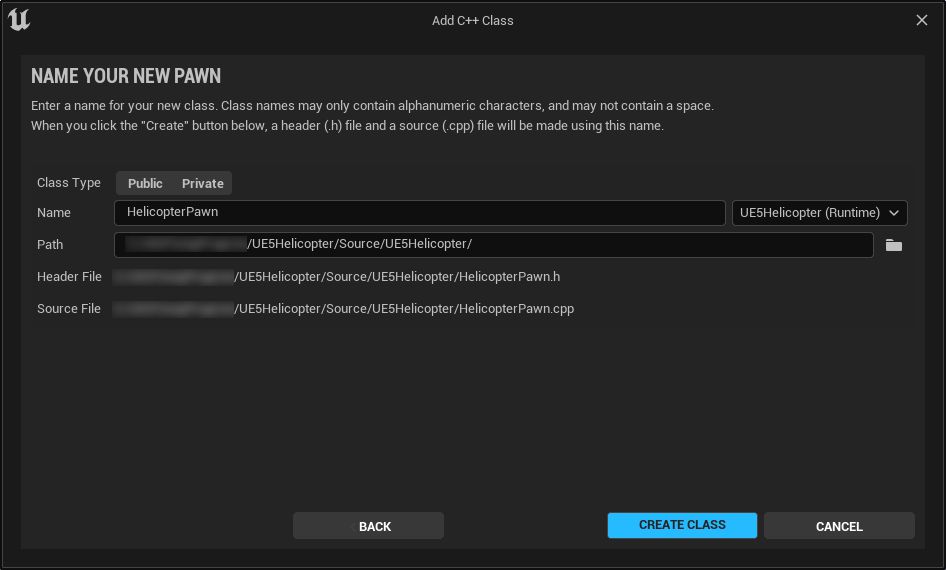
- Name your new pawn class and click Create Class. I named my pawn as HelicopterPawn
Now it should create your new class and compile C++ code for it. It might take some time, especially if your project is a blueprint project without any C++ classes in it. After it will be done compiling, you should see a sound notification and it should open Visual Studio (If you have set up a visual studio as your default IDE for Unreal Engine) with your newly created class files opened in it.
#pragma once

#include "CoreMinimal.h"
#include "GameFramework/Pawn.h"
#include "HelicopterPawn.generated.h"

UCLASS()
class UE5HELICOPTER_API AHelicopterPawn : public APawn
{
	GENERATED_BODY()

public:
	// Sets default values for this pawn's properties
	AHelicopterPawn();

protected:
	// Called when the game starts or when spawned
	virtual void BeginPlay() override;

public:
	// Called every frame
	virtual void Tick(float DeltaTime) override;

	// Called to bind functionality to input
	virtual void SetupPlayerInputComponent(class UInputComponent* PlayerInputComponent) override;

};#include "HelicopterPawn.h"
// Sets default values
AHelicopterPawn::AHelicopterPawn()
{
// Set this pawn to call Tick() every frame. You can turn this off to improve performance if you don't need it.
PrimaryActorTick.bCanEverTick = true;
}
// Called when the game starts or when spawned
void AHelicopterPawn::BeginPlay()
{
Super::BeginPlay();
}
// Called every frame
void AHelicopterPawn::Tick(float DeltaTime)
{
Super::Tick(DeltaTime);
}
// Called to bind functionality to input
void AHelicopterPawn::SetupPlayerInputComponent(UInputComponent* PlayerInputComponent)
{
Super::SetupPlayerInputComponent(PlayerInputComponent);
}Adding components
In the previous tutorial, we added four components to our pawn blueprint. Let's add the same components but in C++ now. Let's start by adding a static mesh component to our class.
- add the following code at the bottom of our class definition header file:
UPROPERTY()
UStaticMeshComponent* Mesh;- add the following code in the constructor of our class cpp file:
Mesh = CreateDefaultSubobject<UStaticMeshComponent>(TEXT("Static Mesh"));
SetRootComponent(Mesh);
In the code, we can see that we are creating a new static mesh component and then making it the root component of our pawn. If you have a question about why pawn class starts with letter A and static mesh component class starts with the letter U, you can read more about that here (if this link is not working anymore, just google "Gameplay Classes Unreal Engine" and you should be able to find a link to the new documentation page).
Now we can try to compile our code and see if it will compile with a first try or it will have some errors.
There are few ways how to do it, we can either build it from our IDE or click the Recompile button in Unreal Engine 5 editor. I had better success rate with Unreal Engine reloading newly compiled code by using Unreal Engine 5 editor compile button. So let's use that for our compiling needs. Also, if sometimes you compile your code, but it seems that it haven't updated in editor, you might want to close your Unreal Engine editor, compile code in IDE and then open Unreal Engine again. That should load in newly compiled code.
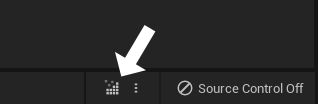
- In the Unreal Engine editor in the bottom right corner press compile button. See the image below.
When you press the button, you should hear an audio notification and see a visual notification that Unreal Engine is compiling C++ code. After some time, you should hear an audio and visual notification that compile has completed or failed. If it is completed, then we can proceed further if it failed, you should be able to open the log from failed notification window and see what's causing your error, if you can't understand your error, use google.
So if your compilation is completed, you can take your pawn C++ class from the Content Drawer in Unreal Engine editor, and pull it into your level. Then select it in the World Outliner, and in the details panel, you should see that our Helicopter Pawn has a static mesh component. But it has one issue, if we select it, we can't change any property for it, everything is disabled for it.

If we look back at our class header file, we see, that above our static mesh component we had UPROPERTY(), and if you have coded in C++ before, you probably haven't seen such a thing in regular C++. That's an Unreal Engine specific macro for properties that defines property metadata and variable specifiers. You don't really need to use them on all of your variables in your C++ classes, but if you want to expose something to blueprints, then you will need to use them. You can read more about them here (if this link is not working anymore, just google "Unreal Engine Documentation Properties" and you should be able to find a link to the new documentation page).
So how we can make our mesh component not disabled? We need to add "VisibleAnywhere" specifier to our UPROPERTY(). If you have read the documentation about property specifiers, you might have seen the "EditAnywhere" specifier, and might have a question, why aren't we using it? "VisibleAnywhere" makes components visible in blueprints so we can access component properties that have set edit specifiers on them, that's all what we need in blueprints. "EditAnywhere" will not only give access to component properties but would also give the ability to change its pointer value to point to some other thing, and we don't want to mess with pointers in blueprints.
- Edit static mesh component in header file like in the code below
UPROPERTY(VisibleAnywhere)
UStaticMeshComponent* Mesh;
If we compile our code now, we should be able to change our static mesh component properties in the editor.
We managed to add one component to our class, let's add our other components.
- add the following code at the bottom of our class definition header file:
UPROPERTY(VisibleAnywhere)
class USpringArmComponent* SpringArm;

UPROPERTY(VisibleAnywhere)
class UCameraComponent* Camera;

UPROPERTY(VisibleAnywhere)
class UPhysicsThrusterComponent* PhysicsThruster;
Why do we have the class keyword in front of component declarations? That's called a forward declaration, we put the class keyword before, so we wouldn't need to include those classes in our header file, which could make a circular dependency and other problems for a compiler. I suggest to google more about forward declaration and circular dependencies to really understand them.
- add the following code at the the end of constructor in our class cpp file:
SpringArm = CreateDefaultSubobject<USpringArmComponent>(TEXT("Spring Arm"));
SpringArm->AttachToComponent(Mesh, FAttachmentTransformRules::KeepWorldTransform);

Camera = CreateDefaultSubobject<UCameraComponent>(TEXT("Camera"));
Camera->AttachToComponent(SpringArm, FAttachmentTransformRules::KeepWorldTransform);

PhysicsThruster = CreateDefaultSubobject<UPhysicsThrusterComponent>(TEXT("Physics Thruster"));
PhysicsThruster->AttachToComponent(Mesh, FAttachmentTransformRules::KeepWorldTransform);
Now if we will try to compile our code, it should fail to compile. And we should see the following errors in our log.

We have these errors because we don't have included header files in our cpp file for our newly added components. Why didn't we have to do that for the static mesh component? It's most likely that there is some declaration about the static mesh component in our parent APawn class.
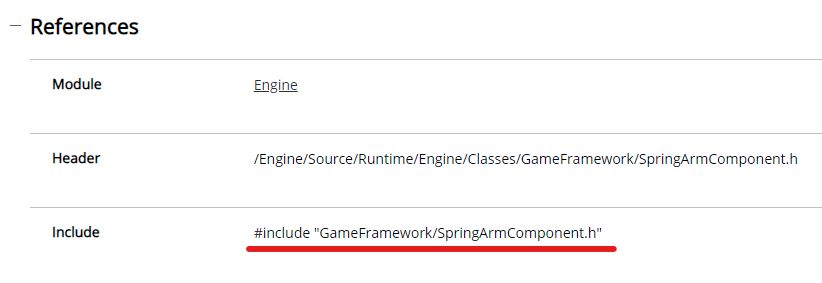
So how do we find what headers exactly we need to include in our cpp file? Personally I just google the full component class name, and then open the unreal engine documentation link for that class. And into it, we can find what header we need to include in our cpp file.
For example, I google USpringArmComponent, then I click on the first link that directs to unreal engine documentation. Then I find the References section there, and from there I copy the include line.
- add the following code at the end of our class include list in cpp file:
#include "GameFramework/SpringArmComponent.h"
#include "Camera/CameraComponent.h"
#include "PhysicsEngine/PhysicsThrusterComponent.h"
In the previous tutorial, we did change some properties for components, let's do the same thing in C++ too.
- add the following code at the end of the constructor of our class cpp file:
//Not setting mesh asset in here,
//because don't want to deal with having mesh asset always in a predetermined location
Mesh->SetSimulatePhysics(true);
Mesh->SetLinearDamping(1);
Mesh->SetAngularDamping(1);

//Not setting thruster location, because we don't know what mesh will be set
PhysicsThruster->SetRelativeRotation(FRotator(-90, 0, 0));
PhysicsThruster->bAutoActivate = true;

SpringArm->TargetArmLength = 800;
SpringArm->SetRelativeRotation(FRotator(-20, 0, 0));
SpringArm->bDoCollisionTest = false;
SpringArm->bInheritPitch = false;
SpringArm->bInheritRoll = false;

//Put in here just for testing to automatically possess pawn
this->AutoPossessPlayer = EAutoReceiveInput::Player0;
You can see comments in code, about why we didn't do exactly the same things as we did for blueprints.
Center of mass offset fix
Before we start to add functionality for our input bindings, we need to fix the center of mass offset problem we had in the previous tutorial.
- add the following code at the end of the BeginPlay function in our class cpp file:
FVector ThrusterCenterOfMassDifference = PhysicsThruster->GetComponentLocation() - Mesh->GetCenterOfMass();
FRotator InvertedMeshRotation = Mesh->GetComponentRotation().GetInverse();
FVector CenterOfMassActualOffset = InvertedMeshRotation.RotateVector(ThrusterCenterOfMassDifference);
FVector CenterOfMassWantedOffset = FVector(CenterOfMassActualOffset.X, CenterOfMassActualOffset.Y, 0);
Mesh->SetCenterOfMass(CenterOfMassWantedOffset, FName());
Adding input bindings
In blueprints, we can simply get a node with the name of our input binding, and then use that for setting up our functionality for inputs. In C++ we need to make functions and then bind those to our defined inputs. Let's start by defining our functions first.
- add the following code at the bottom of our class header file:
UFUNCTION()
void MouseRight(float Value);

UFUNCTION()
void MouseUp(float Value);

UFUNCTION()
void MoveUp(float Value);

UFUNCTION()
void RotateRight(float Value);

UFUNCTION()
void TiltForward(float Value);

UFUNCTION()
void TiltRight(float Value);- add the following code at the end of our class cpp file:
void AHelicopterPawn::MouseRight(float Value)
{
}

void AHelicopterPawn::MouseUp(float Value)
{
}

void AHelicopterPawn::MoveUp(float Value)
{
}

void AHelicopterPawn::RotateRight(float Value)
{
}

void AHelicopterPawn::TiltForward(float Value)
{
}

void AHelicopterPawn::TiltRight(float Value)
{
}
We have our functions defined, now we need to bind them to our defined inputs. We can do that by declaring bindings in the SetupPlayerInputComponent function.
- add the following code at the end of the SetupPlayerInputComponent function in our class cpp file:
PlayerInputComponent->BindAxis("Mouse Right", this, &AHelicopterPawn::MouseRight);
PlayerInputComponent->BindAxis("Mouse Up", this, &AHelicopterPawn::MouseUp);
PlayerInputComponent->BindAxis("Move Up", this, &AHelicopterPawn::MoveUp);
PlayerInputComponent->BindAxis("Rotate Right", this, &AHelicopterPawn::RotateRight);
PlayerInputComponent->BindAxis("Tilt Forward", this, &AHelicopterPawn::TiltForward);
PlayerInputComponent->BindAxis("Tilt Right", this, &AHelicopterPawn::TiltRight);
Now we have our bindings set up, and we can proceed by adding functionality for our inputs. Also, you might see, that we only had bindings for axis inputs, because for our helicopter we only used axis type inputs. You can read more about input bindings here.
- add the code as seen below to our input binding functions in our class cpp file:
void AHelicopterPawn::MouseRight(float Value)
{
	SpringArm->AddRelativeRotation(FRotator(0, Value, 0));
}

void AHelicopterPawn::MouseUp(float Value)
{
	SpringArm->AddRelativeRotation(FRotator(Value, 0, 0));
}

void AHelicopterPawn::MoveUp(float Value)
{
	float DesiredUpForce = Value * 100 + 970;
	PhysicsThruster->ThrustStrength = DesiredUpForce / GetActorUpVector().Z * Mesh->GetMass();
}

void AHelicopterPawn::RotateRight(float Value)
{
	Mesh->AddTorqueInDegrees(GetActorUpVector() * Value * 60, FName(), true);
}

void AHelicopterPawn::TiltForward(float Value)
{
	float DesiredAngle = Value * 30 + Mesh->GetComponentRotation().Pitch;
	float ClampedValue = FMath::Clamp(DesiredAngle, -20.f, 20.f);
	Mesh->AddTorqueInDegrees(GetActorRightVector() * ClampedValue * 5, FName(), true);
}

void AHelicopterPawn::TiltRight(float Value)
{
	float DesiredAngle = Value * -30 + Mesh->GetComponentRotation().Roll;
	float ClampedValue = FMath::Clamp(DesiredAngle, -20.f, 20.f);
	Mesh->AddTorqueInDegrees(GetActorForwardVector() * ClampedValue * 5, FName(), true);
}
You can read more about each function in the previous tutorial.
Exposing properties to editor and blueprints
If we look at our code, we can see that there are lots of hardcoded values in it. If we would give this pawn to use for a game designer, and he wanted to change tilting speed or some other values, he would need to open the C++ code of the pawn, then manually change a value in code, and recompile it. That's not the most practical way to do this. To be honest, in the blueprints version of this helicopter, we also didn't have set up values to be easily changeable, but anyways it would have been faster to adjust those values in blueprints than in C++ code.
The first step for exposing our hardcoded values would be to change them with newly declared properties.
- add the following code at the bottom of our class header file:
UPROPERTY(EditAnywhere, BlueprintReadWrite, Category = "Helicopter Movement")
float VariableUpForce = 100;

UPROPERTY(EditAnywhere, BlueprintReadWrite, Category = "Helicopter Movement")
float ConstantUpForce = 970;

UPROPERTY(EditAnywhere, BlueprintReadWrite, Category = "Helicopter Movement")
float YawRotationSpeed = 60;

UPROPERTY(EditAnywhere, BlueprintReadWrite, Category = "Helicopter Movement")
float DesiredTiltAngle = 30;

UPROPERTY(EditAnywhere, BlueprintReadWrite, Category = "Helicopter Movement")
float TiltSpeedClampBound = 20;

UPROPERTY(EditAnywhere, BlueprintReadWrite, Category = "Helicopter Movement")
float TiltingSpeed = 5;- replace movement functions with code seen below in our class cpp file:
void AHelicopterPawn::MoveUp(float Value)
{
	float DesiredUpForce = Value * VariableUpForce + ConstantUpForce;
	PhysicsThruster->ThrustStrength = DesiredUpForce / GetActorUpVector().Z * Mesh->GetMass();
}

void AHelicopterPawn::RotateRight(float Value)
{
	Mesh->AddTorqueInDegrees(GetActorUpVector() * Value * YawRotationSpeed, FName(), true);
}

void AHelicopterPawn::TiltForward(float Value)
{
	float DesiredAngle = Value * DesiredTiltAngle + Mesh->GetComponentRotation().Pitch;
	float ClampedValue = FMath::Clamp(DesiredAngle, -TiltSpeedClampBound, TiltSpeedClampBound);
	Mesh->AddTorqueInDegrees(GetActorRightVector() * ClampedValue * TiltingSpeed, FName(), true);
}

void AHelicopterPawn::TiltRight(float Value)
{
	float DesiredAngle = Value * -DesiredTiltAngle + Mesh->GetComponentRotation().Roll;
	float ClampedValue = FMath::Clamp(DesiredAngle, -TiltSpeedClampBound, TiltSpeedClampBound);
	Mesh->AddTorqueInDegrees(GetActorForwardVector() * ClampedValue * TiltingSpeed, FName(), true);
}
We can see, that we used EditAnywhere, BlueprintReadWrite, Category = "Helicopter Movement" specifiers for properties.
- "EditAnywhere" means that we will be able to see and edit these values in property windows anywhere where it's possible to have a property window.
- "BlueprintReadWrite" means that we will be able to get these values by using blueprints.
- Category = "Helicopter Movement" means that all these properties will be placed under the Helicopter Movement category in property and blueprint windows.
We might just stop it here, but we can look at how we could fix some more problems by using property specifiers. For example, we don't want to allow set "TiltSpeedClampBound" and "TiltingSpeed" as a negative value in the property window, because it will make our helicopter do weird things if that value is negative. We also might want to clamp the "DesiredTiltAngle" values.
- update class definition header file properties as seen in the code below:
UPROPERTY(EditAnywhere, BlueprintReadWrite, Category = "Helicopter Movement", meta = (ClampMin = -60, ClampMax = 60))
float DesiredTiltAngle = 30;

UPROPERTY(EditAnywhere, BlueprintReadWrite, Category = "Helicopter Movement", meta = (ClampMin = 0))
float TiltSpeedClampBound = 20;

UPROPERTY(EditAnywhere, BlueprintReadWrite, Category = "Helicopter Movement", meta = (ClampMin = 0))
float TiltingSpeed = 5;
Now if you compile it, you should see, that in the Unreal Engine editor property window for our helicopter, we can set Desired Tilt Angle only between -60 and 60, and that we can't set Tilt Speed Clamp Bound and Tilting Speed below 0.
This is nice, now our designer who would work with our helicopter pawn can't set those values out of our desired bounds. Well, he can't set those out of bounds if he used property windows, but he still can set them out of our desired bounds by using blueprints.
We can fix that too, by adding a few more property specifiers and functions to our code.
- update class definition header file properties and add new function definitions as seen in the code below:
public:
	UFUNCTION(BlueprintSetter)
	void SetDesiredTiltAngle(float Value);

	UFUNCTION(BlueprintGetter)
	float GetDesiredTiltAngle();

	UFUNCTION(BlueprintSetter)
	void SetTiltSpeedClampBound(float Value);

	UFUNCTION(BlueprintGetter)
	float GetTiltSpeedClampBound();

	UFUNCTION(BlueprintSetter)
	void SetTiltingSpeed(float Value);

	UFUNCTION(BlueprintGetter)
	float GetTiltingSpeed();

private:
	UPROPERTY(EditAnywhere, BlueprintSetter = SetDesiredTiltAngle, BlueprintGetter = GetDesiredTiltAngle,
				Category = "Helicopter Movement", meta = (ClampMin = -60, ClampMax = 60))
	float DesiredTiltAngle = 30;

	UPROPERTY(EditAnywhere, BlueprintSetter = SetTiltSpeedClampBound, BlueprintGetter = GetTiltSpeedClampBound,
				Category = "Helicopter Movement", meta = (ClampMin = 0))
	float TiltSpeedClampBound = 20;

	UPROPERTY(EditAnywhere, BlueprintSetter = SetTiltingSpeed, BlueprintGetter = GetTiltingSpeed,
				Category = "Helicopter Movement", meta = (ClampMin = 0))
float TiltingSpeed = 5;- add the code as seen below at the end of our class cpp file:
void AHelicopterPawn::SetDesiredTiltAngle(float Value)
{
	DesiredTiltAngle = FMath::Clamp(Value, -60.f, 60.f);
}

float AHelicopterPawn::GetDesiredTiltAngle()
{
	return DesiredTiltAngle;
}

void AHelicopterPawn::SetTiltSpeedClampBound(float Value)
{
	TiltSpeedClampBound = Value > 0 ? Value : 0;
}

float AHelicopterPawn::GetTiltSpeedClampBound()
{
	return TiltSpeedClampBound;
}

void AHelicopterPawn::SetTiltingSpeed(float Value)
{
	TiltingSpeed = Value > 0 ? Value : 0;
}

float AHelicopterPawn::GetTiltingSpeed()
{
	return TiltingSpeed;
}
We made our properties private in our header file and removed "BlueprintReadWrite" specifiers for them, and instead of that, we added "BlueprintSetter" and "BlueprintGetter" specifiers, that shows which functions should be responsible for setting and getting values in blueprints. We also added setter and getter public functions for those properties, and we can see, that in setters, we have set restrictions so we wouldn't get values we don't want to have.
#pragma once

#include "CoreMinimal.h"
#include "GameFramework/Pawn.h"
#include "HelicopterPawn.generated.h"

UCLASS()
class UE5HELICOPTER_API AHelicopterPawn : public APawn
{
	GENERATED_BODY()

public:
	// Sets default values for this pawn's properties
	AHelicopterPawn();

protected:
	// Called when the game starts or when spawned
	virtual void BeginPlay() override;

public:
	// Called every frame
	virtual void Tick(float DeltaTime) override;

	// Called to bind functionality to input
	virtual void SetupPlayerInputComponent(class UInputComponent* PlayerInputComponent) override;

	// Add these 2 lines below
	UPROPERTY(VisibleAnywhere)
	UStaticMeshComponent* Mesh;

	UPROPERTY(VisibleAnywhere)
	class USpringArmComponent* SpringArm;

	UPROPERTY(VisibleAnywhere)
	class UCameraComponent* Camera;

	UPROPERTY(VisibleAnywhere)
	class UPhysicsThrusterComponent* PhysicsThruster;

	UFUNCTION()
	void MouseRight(float Value);

	UFUNCTION()
	void MouseUp(float Value);

	UFUNCTION()
	void MoveUp(float Value);

	UFUNCTION()
	void RotateRight(float Value);

	UFUNCTION()
	void TiltForward(float Value);

	UFUNCTION()
	void TiltRight(float Value);

	UPROPERTY(EditAnywhere, BlueprintReadWrite, Category="Helicopter Movement")
	float VariableUpForce = 100;

	UPROPERTY(EditAnywhere, BlueprintReadWrite, Category = "Helicopter Movement")
	float ConstantUpForce = 970;

	UPROPERTY(EditAnywhere, BlueprintReadWrite, Category = "Helicopter Movement")
	float YawRotationSpeed = 60;

	UFUNCTION(BlueprintSetter)
	void SetDesiredTiltAngle(float Value);

	UFUNCTION(BlueprintGetter)
	float GetDesiredTiltAngle();

	UFUNCTION(BlueprintSetter)
	void SetTiltSpeedClampBound(float Value);

	UFUNCTION(BlueprintGetter)
	float GetTiltSpeedClampBound();

	UFUNCTION(BlueprintSetter)
	void SetTiltingSpeed(float Value);

	UFUNCTION(BlueprintGetter)
	float GetTiltingSpeed();

private:
	UPROPERTY(EditAnywhere, BlueprintSetter = SetDesiredTiltAngle, BlueprintGetter = GetDesiredTiltAngle,
				Category = "Helicopter Movement", meta = (ClampMin = -60, ClampMax = 60))
	float DesiredTiltAngle = 30;

	UPROPERTY(EditAnywhere, BlueprintSetter = SetTiltSpeedClampBound, BlueprintGetter = GetTiltSpeedClampBound,
				Category = "Helicopter Movement", meta = (ClampMin = 0))
	float TiltSpeedClampBound = 20;

	UPROPERTY(EditAnywhere, BlueprintSetter = SetTiltingSpeed, BlueprintGetter = GetTiltingSpeed,
				Category = "Helicopter Movement", meta = (ClampMin = 0))
	float TiltingSpeed = 5;
};- cpp file:
#include "HelicopterPawn.h"
#include "GameFramework/SpringArmComponent.h"
#include "Camera/CameraComponent.h"
#include "PhysicsEngine/PhysicsThrusterComponent.h"

// Sets default values
AHelicopterPawn::AHelicopterPawn()
{
 	// Set this pawn to call Tick() every frame.  You can turn this off to improve performance if you don't need it.
	PrimaryActorTick.bCanEverTick = true;

	//Add these 2 lines below
	Mesh = CreateDefaultSubobject<UStaticMeshComponent>(TEXT("Static Mesh"));
	SetRootComponent(Mesh);

	SpringArm = CreateDefaultSubobject<USpringArmComponent>(TEXT("Spring Arm"));
	SpringArm->AttachToComponent(Mesh, FAttachmentTransformRules::KeepWorldTransform);

	Camera = CreateDefaultSubobject<UCameraComponent>(TEXT("Camera"));
	Camera->AttachToComponent(SpringArm, FAttachmentTransformRules::KeepWorldTransform);

	PhysicsThruster = CreateDefaultSubobject<UPhysicsThrusterComponent>(TEXT("Physics Thruster"));
	PhysicsThruster->AttachToComponent(Mesh, FAttachmentTransformRules::KeepWorldTransform);

	//Not setting mesh asset in here,
	//because don't want to deal with having mesh asset always in a predetermined location
	Mesh->SetSimulatePhysics(true);
	Mesh->SetLinearDamping(1);
	Mesh->SetAngularDamping(1);

	//Not setting thruster location, because we don't know what mesh will be set
	PhysicsThruster->SetRelativeRotation(FRotator(-90, 0, 0));
	PhysicsThruster->bAutoActivate = true;

	SpringArm->TargetArmLength = 800;
	SpringArm->SetRelativeRotation(FRotator(-20, 0, 0));
	SpringArm->bDoCollisionTest = false;
	SpringArm->bInheritPitch = false;
	SpringArm->bInheritRoll = false;

	//Put in here just for testing to automatically possess pawn
	this->AutoPossessPlayer = EAutoReceiveInput::Player0;
}

// Called when the game starts or when spawned
void AHelicopterPawn::BeginPlay()
{
	Super::BeginPlay();

	FVector ThrusterCenterOfMassDifference = PhysicsThruster->GetComponentLocation() - Mesh->GetCenterOfMass();
	FRotator InvertedMeshRotation = Mesh->GetComponentRotation().GetInverse();
	FVector CenterOfMassActualOffset = InvertedMeshRotation.RotateVector(ThrusterCenterOfMassDifference);
	FVector CenterOfMassWantedOffset = FVector(CenterOfMassActualOffset.X, CenterOfMassActualOffset.Y, 0);
	Mesh->SetCenterOfMass(CenterOfMassWantedOffset, FName());
}

// Called every frame
void AHelicopterPawn::Tick(float DeltaTime)
{
	Super::Tick(DeltaTime);

}

// Called to bind functionality to input
void AHelicopterPawn::SetupPlayerInputComponent(UInputComponent* PlayerInputComponent)
{
	Super::SetupPlayerInputComponent(PlayerInputComponent);

	PlayerInputComponent->BindAxis("Mouse Right", this, &AHelicopterPawn::MouseRight);
	PlayerInputComponent->BindAxis("Mouse Up", this, &AHelicopterPawn::MouseUp);
	PlayerInputComponent->BindAxis("Move Up", this, &AHelicopterPawn::MoveUp);
	PlayerInputComponent->BindAxis("Rotate Right", this, &AHelicopterPawn::RotateRight);
	PlayerInputComponent->BindAxis("Tilt Forward", this, &AHelicopterPawn::TiltForward);
	PlayerInputComponent->BindAxis("Tilt Right", this, &AHelicopterPawn::TiltRight);
}

void AHelicopterPawn::MouseRight(float Value)
{
	SpringArm->AddRelativeRotation(FRotator(0, Value, 0));
}

void AHelicopterPawn::MouseUp(float Value)
{
	SpringArm->AddRelativeRotation(FRotator(Value, 0, 0));
}

void AHelicopterPawn::MoveUp(float Value)
{
	float DesiredUpForce = Value * VariableUpForce + ConstantUpForce;
	PhysicsThruster->ThrustStrength = DesiredUpForce / GetActorUpVector().Z * Mesh->GetMass();
}

void AHelicopterPawn::RotateRight(float Value)
{
	Mesh->AddTorqueInDegrees(GetActorUpVector() * Value * YawRotationSpeed, FName(), true);
}

void AHelicopterPawn::TiltForward(float Value)
{
	float DesiredAngle = Value * DesiredTiltAngle + Mesh->GetComponentRotation().Pitch;
	float ClampedValue = FMath::Clamp(DesiredAngle, -TiltSpeedClampBound, TiltSpeedClampBound);
	Mesh->AddTorqueInDegrees(GetActorRightVector() * ClampedValue * TiltingSpeed, FName(), true);
}

void AHelicopterPawn::TiltRight(float Value)
{
	float DesiredAngle = Value * -DesiredTiltAngle + Mesh->GetComponentRotation().Roll;
	float ClampedValue = FMath::Clamp(DesiredAngle, -TiltSpeedClampBound, TiltSpeedClampBound);
	Mesh->AddTorqueInDegrees(GetActorForwardVector() * ClampedValue * TiltingSpeed, FName(), true);
}

void AHelicopterPawn::SetDesiredTiltAngle(float Value)
{
	DesiredTiltAngle = FMath::Clamp(Value, -60.f, 60.f);
}

float AHelicopterPawn::GetDesiredTiltAngle()
{
	return DesiredTiltAngle;
}

void AHelicopterPawn::SetTiltSpeedClampBound(float Value)
{
	TiltSpeedClampBound = Value > 0 ? Value : 0;
}

float AHelicopterPawn::GetTiltSpeedClampBound()
{
	return TiltSpeedClampBound;
}

void AHelicopterPawn::SetTiltingSpeed(float Value)
{
	TiltingSpeed = Value > 0 ? Value : 0;
}

float AHelicopterPawn::GetTiltingSpeed()
{
	return TiltingSpeed;
}
Share on
Related Articles